Collisions
By Ron Coleman, Ph.D.
Table of contents
Abstract
level wall collision detection
Introduction
You probably noticed in the previous tutorial that Grace runs through walls. This is because collision detection was not enabled. Collision detection is a very important topic in games. Collision detection lets the game know when the player character (PC) collides with objects. It also lets the game know when non-player character (NPC) objects collide with PC and other NPC objects.
Collision detection is not very useful without collision handling. That is, you detect a collision but what does it mean? Does the Grace continue? Has Grace reached the goal? Do enemies reverse direction?
In this tutorial, you learn about collision detection and answer the above questions. You learn how to make virtual worlds more easily using Mappy, a level editor. You’ll also learn how to integrate sounds which add an entirely new dimension to the game.
Finally, as matters are getting rather involved, you’ll add a game state machine to manage the game states.
Collision detection
If you search the Web for collision detection, you’ll find different collision approaches and algorithms. The main tradeoffs are efficiency vs. looks. Efficient collision detection does not always look good and good looking collision detection is not always efficient.
Gedi uses three simple algorithms: rectangular, spherical, and precise. They each assume ABO-ABO collision detection. That is, you can only ask if two ABO objects are colliding. They provide no mechanism non-ABO collision detection.
The rectangular method reports a collision if bounding rectangles of ABO objects overlap. The spherical method reports a collision if the distance, d, between the centers of ABO objects is less than or equal to the sum of the radii, r1+r2. See the figure below.
Figure 1
These methods, defined on the ABO class, are very efficient. With a few simple calculations you can know—possibly—when objects are colliding. Obviously they work best if the ABO is either rectangular or spherical, respectively. If not, the collision won’t look good, i.e., it won’t look realistic or even plausible. This is one reason collision detection is a rich area. Most game objects of interest are neither rectangular nor spherical and much work has gone into solving specific and general problems of collision detection.
Gedi provides yet another method which uses pixel-level collision detection. It is defined on the PreciseABO class which extends DynABO and it reports a collision if two non-transparent pixels overlap. It is guaranteed to look great provided only that the ABO has not been resized using the ABO::Size method. Furthermore, PreciseABO is not efficient for all types of collisions.
Rule #1 collision handling
The first principle is to know when to employ collision detection. The second principle is to know what to do about it, that is, collision handling. Both principles go back to the game design.
For MazingGrace, we have the following play rules:
1. Walls
stop Grace’s movement.
2. Goals
stop Grace’s movement only indirectly.
Naturally, Rule #1 is the reason there is a maze. Grace has to find a free path though the maze. Rule #2 is the goal itself. That is, Grace needs to be aware of colliding with the goal object.
To handle Rule #1, on collision you need only to prevent Grace from going forward.
“But how,” you ask, “how can Grace detect and handle a collision, if Grace cannot go forward?” It’s a kind of Catch-22. Grace needs to go forward to detect a collision with the wall but Grace cannot go through a wall.
The way around this dilemma is simple. Move Grace forward then back up if you detect a collision. The beauty of this approach is that since it’s done in the update phase of the game loop, the player never perceives the forward and backward motion. It all happens before the render phase.
The good news is rectangular collision detection works well here. The not-so good news is there are potentially 300 (=20 x 15) wall tiles to check. Do you have to check every wall tile? That is one way and it would work, too.
A simpler, more efficient way is to use Grace’s position to calculate where a wall tile might be and ask the level if there is a tile at that location. This is an important point. Recall that TiledLayer extends DynABO. That is, TiledLayer does not contain 300 ABO tiles but one: itself. TiledLayer loops over the 2D map and if it finds a wall tile number, it positions itself at that location, and renders a DynABO. Thus, you can’t do ABO-ABO collision in this case since the wall tiles technically only have a definite location in the game world until they’re being rendered.
Rule #2 collision handling
For Rule #2, you apply the same method for the goal except the task is even simpler. There’s exactly one goal in every game level. Since the goal and Grace objects know exactly where they are, there is no need to use Grace’s position to ask if the goal might be there. Just ask if Grace and the goal are colliding and use the precise collision detection.
The only slight complication is that Grace does not need to know that it collided with the goal. There are two reasons for this, one aesthetic and one logical. On the aesthetic side, under inertial movement, Grace appears to have a more substantial collision with the goal if you don’t ask Grace to handle the collision. On the logical side, the code Grace is just simpler if you let the Game class handle it. For instance, you want Game to handle moving the player to the next level, if there is one.
Abstract levels
Rule #1 is common for all levels. Grace never walks through walls. Rule #2 is really a generalization for non-wall collisions. That is, there are gems, monsters, ghosts, etc. which Game handles like the goal collision. The level runs Grace through the list of other sprites on that level and checks for collision with each of them.
Handling non-wall collisions is unique for the level in which they occur. Level 0, for instance, has no gems. Thus, Level 0 only has to deal with Grace-goal collisions. However, Level 1 has gems plus a goal. It has to handle both. Level 2 has gems, enemies, and a goal.
All of this is to suggest some refactoring of the code is needed. We added the AbstractLevel class which is abstract. You can only subclass it. However, it handles only Rule #1 collisions. Level0 and Level1, subclasses of AbstractLevel, handle Rule #2 and all other collisions. The figure below gives a comprehensive view of the class structure.
Figure 2
First observe that AbstractLevel extends Maze. In other words, an abstract level is a maze that can’t update, render, or initialize itself since Update, Render, and Init methods are pure virtual. If, on the other hand, you ask the AbstractLevel about collisions, it does report true or false if an ABO has collided with a wall.
Grace’s start position
Notice in the above figure that AbstractLevel returns the location of Grace, that is, GetGracePos returns a (reference to a) Location object. Why should Grace ask the AbstractLevel where it is?
Keep in mind that Grace doesn’t ask AbstractLevel. Grace polymorphically asks a subclass of AbstractLevel since only subclasses of AbstractLevel know the tile map. Still, why should Grace ask a concrete level where Grace is? The method GetGracePos returns the starting position of Grace in the level. That is, Grace does not inherently know where it starts in a level since, again, only the level knows this. Thus, when a new level starts, Game tells Grace to reset itself and the job of Grace::Reset is to ask the current level for the initial location.
Grace also asks the level if it colliding with anything. Here’s the method of Grace that accomplishes this:
void
Grace::MoveOnCondition(DynABO* pABO) {
UInt32 iW = MZ_TILE_WIDTH;
UInt32 iH = MZ_TILE_HEIGHT;
if((m_iX % iW) != 0 || (m_iY % iH) != 0 ||
m_bMovePending) {
Move(GRACE_MOVE_X,GRACE_MOVE_Y);
SetPosition();
if(m_pLevel->Collide(*pABO) == True)
{
Move(-GRACE_MOVE_X,-GRACE_MOVE_Y);
SetPosition();
}
}
return;
}
Snippet 1
Let’s dissect this method slowly. If this is a method of Grace, then why send in a pointer to Grace’s ABO per the snippet below?
void Grace::MoveOnCondition(DynABO* pABO) {
Snippet 2
The reason is that Grace has four (4) ABO: one for up, one for down, one for left, and one for right. The pointer is pointing to the direction ABO.
Illusion of inertia
Next, you have inertial movement which you studied in the previous tutorial.
UInt32 iW = MZ_TILE_WIDTH;
UInt32 iH
= MZ_TILE_HEIGHT;
if((m_iX %
iW) != 0 || (m_iY % iH) != 0 || m_bMovePending) {
Move(GRACE_MOVE_X,GRACE_MOVE_Y);
SetPosition( );
Snippet 3
Reversing Grace
if(m_pLevel->Collide(*pABO) == True)
{
this->Move(-GRACE_MOVE_X,-GRACE_MOVE_Y);
this->SetPosition();
}
Snippet 4
Here, if you detect a collision on the current level, you simply reverse the move and reset the position. In other words, Grace delegates all questions about collision to the level—since the level knows where walls and other sprites might be. Furthermore, if there is a collision, Grace only cares if the level tells it there was a collision which blocks its movement. Otherwise, Grace doesn’t care.
What we’re suggesting is that Grace might collide with a gem, for instance. According to the MazingGrace game design, gems don’t stop Grace. In fact, Grace doesn’t even need to know the meaning of a gem collision. That information is hidden and managed by the level. In this way, again, Grace remains fairly simple.
Grace::SetPosition sets the position of all the ABOs. This may seem unnecessary but if you don’t do it this way, you end up with a small bug.
void Grace::SetPosition() {
m_kDownABO.SetPosition(m_iX,m_iY,DynABO::TOP|DynABO::LEFT);
m_kUpABO.SetPosition(m_iX,m_iY,DynABO::TOP|DynABO::LEFT);
m_kLeftABO.SetPosition(m_iX,m_iY,DynABO::TOP|DynABO::LEFT);
m_kRightABO.SetPosition(m_iX,m_iY,DynABO::TOP|DynABO::LEFT);
}
Snippet 5
Abstract level wall collision detection
The code for AbstractLevel::CollideWalls seems messy. It calculates where a tile might be and asks if one is actually there. The apparent “mess” comes from having to check all four corners of Grace, rkABO.
Bool32 AbstractLevel::CollideWalls(DynABO&
rkABO) {
// Correct
for TOP|LEFT anchor
UInt32 iW
= rkABO.GetWidth();
UInt32 iH
= rkABO.GetHeight();
UInt32 iX = rkABO.GetXPosition() - iW/2;
UInt32 iY
= rkABO.GetYPosition() - iH/2;
// Check
top left
UInt32
iCol = iX / MZ_TILE_WIDTH;
UInt32
iRow = iY / MZ_TILE_HEIGHT;
UInt32
iTile = GetCell(iRow,iCol);
if(iTile
!= NO_TILE)
return True;
// Check
top right
// (-1
keeps us on the tile)
iCol = (iX
+ iW - 1) / MZ_TILE_WIDTH;
iTile =
GetCell(iRow,iCol);
if(iTile
!= NO_TILE)
return
True;
// Check
bottom left
iRow = (iY
+ iH - 1) / MZ_TILE_HEIGHT;
iCol = iX
/ MZ_TILE_WIDTH;
iTile =
GetCell(iRow,iCol);
if(iTile
!= NO_TILE)
return
True;
// Check
bottom right
iCol = (iX
+ iW - 1) / MZ_TILE_WIDTH;
iRow = (iY
+ iH - 1) / MZ_TILE_HEIGHT;
iTile =
GetCell(iRow,iCol);
if(iTile
!= NO_TILE)
return
True;
return
False;
}
Snippet 6
To get a better idea of what’s going on, consider the figure below.
Figure 3. The gray tiles are wall tiles; the clear tiles are empty.
Grace is moving to the right. Suppose you check only the upper left corner of Grace. There would be no wall tile there. Why? The reason is Grace is there! If you check the lower left, you get the same answer.
However, Grace is colliding on the right side and if you check the upper right or lower right corners, AbstractLevel::CollideWalls indeed reports a collision. For any one side you need to check only one corner. The problem is you don’t know in advance which side and so in the worst-case—which is most of the time—you’ll have to check all four corners.
Offsetting the anchor
Look at the method, Grace::SetPosition (Snippet 7). It sets Grace’s position with a TOP|LEFT anchor. The problem is that anchors only matter for rendering purposes. Anchors have no meaning otherwise. For tile calculation purposes, Grace is not at its GetXPosition and GetYPosition but its corrected position which compensates for the anchor.
// Correct
for TOP|LEFT anchor
UInt32 iW
= rkABO.GetWidth();
UInt32 iH
= rkABO.GetHeight();
UInt32 iX
= rkABO.GetXPosition() - iW/2;
UInt32 iY
= rkABO.GetYPosition() - iH/2;
Snippet 7
You compensate for the anchor by reversing it. That’s the role of the code below. You are re-centering Grace by pulling it back to the left and up toward the top.
As an example consider the code which checks the top left corner.
// Check
top left
UInt32
iCol = iX / MZ_TILE_WIDTH;
UInt32
iRow = iY / MZ_TILE_HEIGHT;
UInt32 iTile = GetCell(iRow,iCol);
if(iTile
!= NO_TILE)
return
True;
Snippet 8
After you corrected the X, Y position, you then ask the TiledLayer for the corresponding tile number at that location. If there is a tile there, you have a collision. Otherwise, you continue to test the other corners.
Level 0 collision detection
Collision detection for Level 0 is simple as there are only two possibilities: 1) Grace collides with a wall or 2) Grace collides with the goal. Wall-checking collisions are delegated to the abstract level, AbstractLevel::CollideWalls.
Bool32 Level0::Collide(PreciseABO& rkABO) {
if(AbstractLevel::Collide(rkABO))
return
True;
Bool32
bFlag = m_kGoalABO.Collide(rkABO);
if(bFlag)
m_bComplete = True;
return
False;
}
Snippet 9
Note that Level0::Collide overrides AbstractLevel::Collide polymorphically since Collide is a virtual method.
PreciseABO::Collide method
Checking for collision with the goal is much simpler. You use PreciseABO::Collide. Internally, PreciseABO::Collide first checks for collision using rectangular collision, namely, DynABO::Collide. Only if this returns true, PreciseABO::Collide tries pixel-level collision detection.
While the details of pixel-level collision detection are beyond the scope of this tutorial, the method is fairly straightforward. PreciseABO::Collide first calculates the bounding rectangles of the collision for both Grace and the goal. That is, there are two separate but overlapping rectangles: one for Grace and one for the goal. The code then systematically scans both rectangles in lock-step. If it detects a transparent pixel—that is, a pixel of the color key—in either rectangle for a given offset, the code tries the next pixel and so on. Only if two pixels are not the color key will the code return True.
Level 1 collision detection
Level 1 collision detection is initially very similar to Level 0 collision detection. In fact, it first invokes Level 0 collision detection. If Level 0 reports no collision, Level 1 has more work to do—a lot more. It must check and handle collision with gems as the method below suggests
Bool32 Level1::Collide(PreciseABO& rkABO) {
if(Level0::Collide(rkABO))
return
True;
if(m_bComplete)
return
False;
// Check
if we collide with a reward
PreciseABO&
kGraceABO = m_pGrace->GetABO();
vector<PreciseABO*>::iterator
it = m_kGems.begin();
while(it
!= m_kGems.end()) {
if(kGraceABO.Collide(**it))
{
m_kSoundGem.Play();
PreciseABO*
p = *it;
it
= m_kGems.erase(it);
delete
p;
}
else
it++;
}
Snippet 10
To check for collisions with gems, Level 1 iterates through the gems vector, m_kGems, which is a container of ABO objects—or more precisely, pointers to PreciseABO objects. If a precise collision is detected, you play a sound (see below) and “clean up” the gems vectors by deleting the gem in the vector and freeing the storage for the ABO.
How does this work?
it is an iterator for a vector of PreciseABO pointers.
*it is a pointer to a PreciseABO object.
**it is a PreciseABO object.
After you find which gem, if any, has collided with Grace, you then check if there are more gems. If not, you ring the gong and open the trap door—or doors. (Remember: some levels have multiple trap doors, although Level 1 has just one.)
if(!m_bRang
&& m_kGems.size() == 0) {
m_kSoundTrap.Play();
OpenTraps();
m_bRang
= True;
}
return
False;
}
Snippet 11
The locations of trap doors in the tile map are stored in the m_kTraps vector. Thus, OpenTraps basically runs code similar to Snippet 10. The difference is that OpenTraps first uses the locations of traps to poke NO_TILE into the tile map—this ensures that TiledLayer won’t render the traps. Then, OpenTraps deletes all the locations of traps—they are no longer needed since the traps have opened!
Game state machines
The code has now become reasonably involved and you need a way to manage, or at least contain, this complexity. You use the Game class for this purpose. Game serves two purposes:
1. It’s a container of all the top-level objects like Grace, the levels, the input controller, etc.
2. It controls the flow of the game using a finite state machine (FSM).
FSMs are based on automata theory. They are the basis for studies in computability, namely, what is computable in theory and they are indispensable for grappling with formal language topics like compilers and regular expressions. They have wide applications in other areas, too, like networks, logic design, and in our case, games.
In strictly formal terms, a FSM is a table of records called triples. Each record in the triple table has the form:
{
The
In our case, the
The Input is an event like Grace
collided with the goal. In that case, the
In UML notation, ovals represent states and the arrows represent next state transitions. The circle symbols represent begin and terminal states, respectively, of the machine.
![]() - Begin state
- Begin state
Figure 4
![]() - Terminal state
- Terminal state
Figure 5
The notation [C] above or on a transition represents the input or guarded condition. If condition C is true, then the machine executes the transition. Otherwise, the machine does not execute the transition.
The figure below gives a simple
state machine for MazingGrace. Note that that this is the global state machine
run by the method, Game::
Figure 6
The timeout guard implies a timer expired.
Game class
The Game::
void Game::Loop() {
switch(m_iState) {
case
GAME_SIGNON:
break;
case
GAME_MENU:
break;
case
GAME_LEVEL_START:
OpenLevel( );
break;
case
GAME_LEVEL_END:
CloseLevel( );
break;
case
GAME_RUNNING:
Run( );
break;
case
GAME_PAUSE:
break;
case
GAME_PLAYER_CRASH:
break;
case
GAME_OVER:
EndGame();
break;
}
Timer::Wait(GAME_FRAME_DELAY);
m_iStep +=
1;
}
Snippet 12
The states of the game, GAME_RUNNING, GAME_OVER, etc., are defined by an enumerated type, GameState. Some states in this version of MG are not yet implemented. For instance, GAME_SIGNON and GAME_MENU states have only placeholders for the time being.
Level start state
If you look at the method, Game::Init, you notice that the initial state is GAME_LEVEL_START. This causes the game to immediately invoke the Game::OpenLevel method.
The MazingGrace game design requires the game to present an inter-level screen prior to starting the next level. Game::OpenLevel carries out this function. For 2 seconds (i.e., 60 steps—one step is 1/30 seconds), it renders a screen that has the level number on it. After to 2 seconds, it sets m_iState to GAME_RUNNING.
Running state
In the GAME_RUNNING state, the game invokes Game::Run which executes the usual update and render phases. However, Game::Run must do more.
Run also has to enable to the transition to the next phase of the game. Per the snippet below, it gets the (micro-)state of the current level. The level can be in one of three possible states:
- Completed level
- Crashed into enemy
- Neither of the above
As you can guess, the state of the level is dependent on the state of Grace. For Level 0, Grace has either completed Level 0 by reaching the goal or Grace has not reached the goal. The crashed state is not meaningful, not yet, as Level 0 has no enemies.
void Game::Run() {
Update();
Render();
if(m_kLevels[m_iCurrentLevel]->Completed() == True) {
UInt32
iSize = (UInt32) m_kLevels.size();
if(m_iCurrentLevel+1 >= iSize)
m_iState = GAME_OVER;
else
m_iState = GAME_LEVEL_END;
}
else
if(m_kLevels[m_iCurrentLevel]->Crashed() == True)
m_iState = GAME_PLAYER_CRASH;
return;
}
Snippet 13
The Run method thus stays in the run state or it transitions to the GAME_OVER, GAME_LEVEL_END, or GAME_PLAYER_CRASH, states—just as the FSM diagram indicates. Indeed, if you trace through Game, you’ll see other mechanics of the FSM.
Notice all levels are contained by the m_kLevels object. This is a vector of pointers to AbstractLevel instances. In fact, here’s the Game scope declaration of m_kLevels:
std::vector<AbstractLevel*> m_kLevels;
Snippet 14
Game::Init initializes m_kLevels with an instance of Level0.
Meet Mappy
So now we’ve come full circle and we’re discussing levels again. Recall that MG levels have 300 tiles. This degree of complexity is difficult to manage without automation. A level editor helps.
You have a number of level editors at your disposal. Some are commercial quality and expensive. Others are free. In either case, there is a learning curve to become proficient and to achieve a level (no pun!) of mastery.
I’ve tried three or four of them over the years on different projects and my favorite is Mappy. It’s intuitive, functional, and the basic version, free. Still, Mappy wants to do things the Mappy way and in that sense, like most products, it’s not perfect.
Go to the Mappy website. Download and install the MappyWin32 file. (Note: You won’t need the playback libraries, source, etc.)
In the next section, we’re going to provide the briefest introduction to Mappy. For more in-depth discussion of Mappy and its capabilities, we suggest readers download the Mappy tutorial. Go to the bottom of the main Mappy website page and click on the Mappy Tutorial 1 link.
A brief Mappy tutorial
The general idea underlying Mappy is that a virtual world is composed of one or more layers. A layer is very much like the concept of tiled layer you’ve been developing for MazingGrace. It appears that Mappy supports up to seven (7) layers. The only downside to Mappy layers is that there does not appear to be a direct way to view all layers simultaneously.
To see Mappy in action for MazingGrace, launch Mappy and do File -> Open… and browse to the level0.FMP file. (It’s in the VC++ project folder under the levels subfolder.) Open level0.FMP.You should see the image in the figure below.
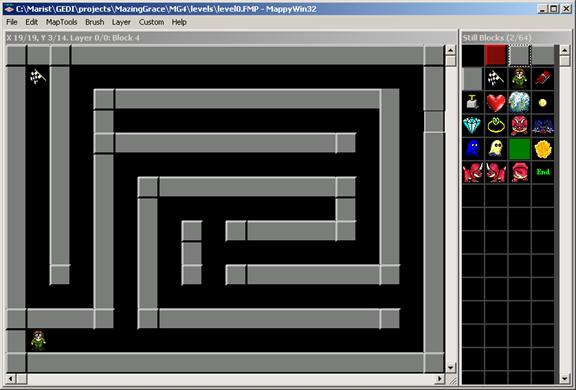
Figure 7
The panel on the left is the virtual world. You populate it with tiles. The panel on the right contains the tiles. To place a tile in the layer, left click one in the tile panel then left click in the layer. The tile “drops” into the layer. Note: don’t do drag-and-drop. Just drop.
To repeat tiles, drag in the layer.
To select a different tile, left click in the tiles panel.
Note that the blank tile in the upper left corner of the tiles panel is blank. This is the NO TILE tile. Use this tile to set empty tiles.
Interfacing to Mappy
The tiles panel of Mappy contains the tiles you use to create the virtual world. These tiles have been imported into Mappy from the file, graphics/fgall.bmp. In other words, the Mappy FMP file contains a copy of fgall.bmp.
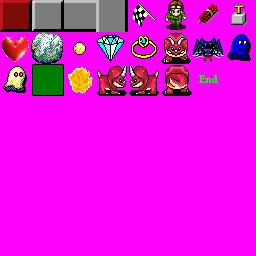
Figure 8 This is fgall.bmp.
This file is formatted for a DynABO image. It is 256x256 and the transparent background is “hot pink” (if you’re reading this in color) which is the color key for both MazingGrace (specified in the fg_tiles.txt descriptor file) and for Mappy. When you import an image into Mappy, you can give the color key—in this case, RGB(255,0,255).
One of the useful features of Mappy is that it provides ways to interface to its maps. The most portable way to Mappy is to use the Mappy export feature. It exports the map as a CSV (comma separated value) file. Tiles that are in the Mappy map appear as tile numbers in the CSV file.
However, here’s the catch. Mappy tile numbers start at zero. NO TILE is tile number zero. The first “real” tile number is 1 as far as Mappy is concerned. There is a “catch” because the first “real” tile number is zero as far as TiledLayer is concerned. In fact, TiledLayer uses -1, not zero, to mean NO TILE.
Yet if you subtract one from Mappy tile numbers, everything works perfectly. In other words, Mappy’s NO TILE becomes tile number -1. Mappy tile numbers, when decremented by one, match what TiledLayer expects. The table below shows this relationship for the wall tiles.
Table 1
|
Tile |
Mappy tile |
Mappy tile -1 |
TiledLayer |
|
NO TILE |
0 |
-1 |
-1 |
|
Trap door |
1 |
0 |
0 |
|
Wall corner |
2 |
1 |
1 |
|
Wall horz. |
3 |
2 |
2 |
|
Wall vert. |
4 |
3 |
3 |
The above table is important because not only does TiledLayer expect corrected Mappy tile numbers. TiledLayer does not render tile numbers greater than 3. It skips them.
Level 0 was created as follows. Firstly, you must export the map by doing File -> Export… You get the dialog below. If you check the “Map array as comma values only (?.CSV)” Mappy generates a .CSV file with tile numbers of the map.

Figure 9
Secondly, after exporting the map as a CSV file, you need to copy and paste the CSV into the level class, for instance, the Init method.
Magic reference numbers
Subclasses of AbstractLevel invoke AbstractLevel::Init to “load” the maze into the tiled layer. After the map has been loaded, AbstractLevel::Init scans the map for two special tiles: the Grace and the goal. Why?
Recall that TiledLayer does not render tile numbers greater than three. Tile numbers greater than three are the responsibility of subclasses of TiledLayer and Grace to render. Since every level has a goal AbstractLevel takes care of rendering the goal.
As for rewards, like gems, and other objects, subclasses of AbstractLevel deal with these. In particular, Level1::DeployRewards, invoked after AbstractLevel::Init, scans the tile map for rewards and trap doors. It stores rewards as pointers to ABO objects and traps doors as pointers to locations of trap doors.
Higher levels (not this tutorial) they deploy enemies in a similar manner. The table below summarizes these details.
Table 2
|
Tile number |
Tile type |
Rendered / deployed by… |
|
0 - 3 |
Walls |
TiledLayer |
|
4 |
Goal |
AbstractLevel |
|
5 |
Grace |
Game / AbstractLevel |
|
>5 |
Rewards, enemies, and other objects |
Level1 , Level2 , etc. |
All this is to say that Mappy tile numbers serve two purposes. The first purpose is to render tiles. Thus, the game renders tiles 0-3 directly.
The second purpose of Mappy tile numbers is to act as reference magic numbers. These numbers are stored in Rids.h and are corrected for the Mappy tile number. For instance, Grace is defined as 5 in Rids.h although in Mappy Grace is tile number 6. The code uses these magic numbers for initially deploying rewards, enemies, etc.
Deploying Grace
Grace is not rendered by AbstractLevel, although AbstractLevel records the map location of Grace’s initial position. Game::OpenLevel in the GAME_LEVEL_START state sends the level to Grace using the SetMaze method. Game::OpenLevel invokes Grace::Reset which in turn asks the level for Grace’s location. The figure below gives the sequence diagram.
Figure 10
Digital audio
Game would not be games as we know them today without sounds and Gedi has different ways to play sounds. The good news is that most games sounds you find or buy on the Internet use just those formats that Gedi supports.
DirectX audio is powerful and complex and the different ways to play sounds using Gedi reflect, more or less, different DirectX approaches to digital audio. Thus, from Gedi’s perspective you just need a file. Gedi then relies on DirectX to figure out how to play it. Thus, a single Gedi class may play multiple formats.
The table below gives the three main Gedi audio classes, SoundBuffer, MediaPlayer, and Music, and some of their capabilities.
Table 3
|
|
Gedi Class |
||
|
Capability |
SoundBuffer |
MediaPlayer |
Music |
|
Yes |
Yes |
Yes |
|
|
|
|
Yes |
|
|
|
Yes |
|
|
|
|
|
|
Yes |
|
Audio info |
Yes |
|
|
SoundBuffer is an older class. It extends Sound which came from Mirus. If you use this class, you must also instantiate SoundPlayer and initialize it before loading and audio data with SoundBuffer. SoundPlayer is similar to InputManager: it is a singleton, that is, you need only one instance of it somewhere in the code. Although SoundBuffer cannot loop the sound, you can nevertheless get audio information from it like the length of the sound in seconds to create synchronized functions.
MediaPlayer
is a newer approach. It can presumably play 23 formats including video.
However, its behavior is somewhat dependent on audio version. For instance, it
does not reliably play some
Music is also a newer approach. It is simpler and more versatile than SoundBuffer and more reliable than MediaPlayer. It also loops sounds, which neither SoundBuffer or MediaPlayer do. For these reasons, Music is the class of choice.
As the code below suggests, Game::LoadSounds loads the sound data into instances of Music and in the case of the theme, plays it, too.
void Game::LoadSounds() {
m_kSoundTheme.Init();
m_kSoundTheme.LoadFromFile(SOUND_THEME);
m_kSoundTheme.Play(True);
m_kSoundCheer.Init();
m_kSoundCheer.LoadFromFile(SOUND_CHEER);
m_kSoundGoal.Init();
m_kSoundGoal.LoadFromFile(SOUND_GOAL);
}
Snippet 15
The basic pattern is you must first initialize the Music object, load the music data from a file, and play it. The parameter of Music::Play means loop it, true or false.
Running the program
If you run the program, you will see the inter-level screen (Level 0).
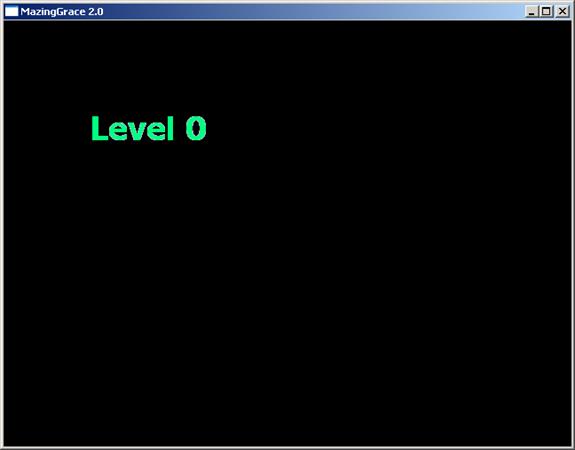
Figure 11. This is the Level 0 inter-level game screen.
Then, you’ll see the Level 0 game screen. (Note: the Level 0 game screen is really Level 1 and the Level 1 game screen is really Level 0. They have been reversed for demonstration purposes.)
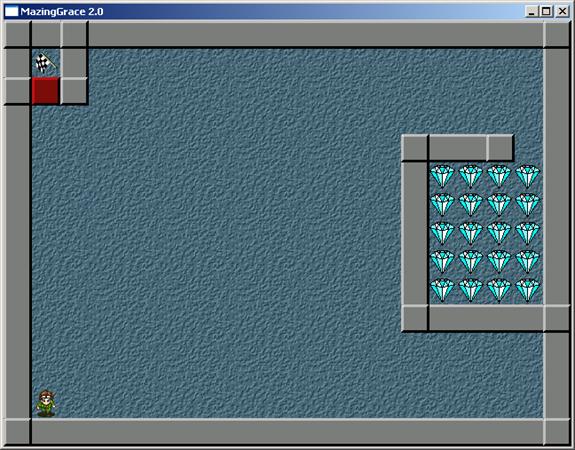
Figure 12. This is the Level 1 game screen.
You should also here the theme song and other sounds.
Questions
- What method invokes the method, Game::Loop?
- The method, Game::Loop, does not invoke Game::Update and Game::Render, not directly. What method invokes these methods? In what game state?
- In the GAME_LEVEL_START state, what method is invoked?
- Grace cannot go forward if there is a collision with a wall. However, you can’t check for a collision with the wall if Grace is unable to go forward. How is this dilemma resolved?
- What method does AbstractLevel::Collide invoke to check for collisions?
- You
could set the position of just one of Grace’s four DynABO objects
when you know Grace is moving in a given direction. That is, in Snippets 5
and 6 you could do this:
pABO->SetPosition(m_iX,m_iY,DynABO::TOP|DynABO::LEFT)
as opposed to the current code which sets the position of all four DynABOs, namely,
this->SetPosition( );
However, we found the first way (pABO->…) leads to a small bug. What is the effect of this bug? What would the player perceive if you used the first way (pABO->…) to set Grace’s position instead of the current way, namely,
(this->SetPosition)?
Hint: Uncomment the statements in the Grace::MoveOnCondition method. See the source code, Grace.cpp. Rebuild and run the game to see the effect.
- How does the Grace sprite get its initial location in the world?
- Which class corrects Mappy tile numbers?
- There is another bug in this version of the code. Grace is not animated during inertial movement. How would you fix this?
- There is yet another bug in this version of the code. If the player changes Grace’s direction during inertial movement, Grace goes into “runaway” mode—it seems to run off on its own, unless it runs into a wall. Why does this happen and how would you fix it?
Micro-Project #1
Use Mappy to design Level 2 which is shown in the figure below.
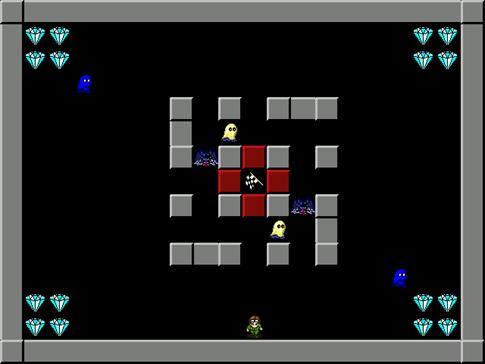
Figure 13 This is the Level 2 level design.
After you design the level, export it as a CSV file. Don’t worry about the C++ code, not yet. That’s covered in MicroProject #2 for this tutorial.
Micro-Project #2
Implement Level 2 in C++ using your Mappy level design from Micro-Project #1 (above).
Game design
![]() (VGhost) moves only vertically at 4 pixels per
step and
(VGhost) moves only vertically at 4 pixels per
step and ![]() (HGhost) moves only horizontally at 4 pixels
per step. Each ghost also selects an initial random direction. For instance, at
the start of the level,
(HGhost) moves only horizontally at 4 pixels
per step. Each ghost also selects an initial random direction. For instance, at
the start of the level, ![]() flips a coin to decide if it is initially
going to go up or down.
flips a coin to decide if it is initially
going to go up or down. ![]() does the same thing to decide if it is
initially going to go left or right.
does the same thing to decide if it is
initially going to go left or right. ![]() (Spider) also moves only vertically except at
5 pixels per step. However, every 20 steps, Spider flips a coin to decide if it
will reverse direction. If heads it continues; if tails it reverses.
(Spider) also moves only vertically except at
5 pixels per step. However, every 20 steps, Spider flips a coin to decide if it
will reverse direction. If heads it continues; if tails it reverses.
Enemies do not collide with each other but reverse direction if they hit a wall. If they collide with Grace, play the Dr. Evil’s evil laugh (sounds/evil_laf.wav) and freeze the game for a few seconds. Then, reset Grace to its initial position and continue the game. Do not worry about lives.
If Grace collects all the gems, open the trap doors. Then, if Grace reaches the goal, go to the next level.
Software design
Naturally, you could do this project in many different ways. However, to accelerate your development, use agile principles and start with the code base, MG4. Furthermore, try the object design in the figure below. It requires a little more upfront work but it saves time and effort later. Besides, this is the model for subsequent tutorials.
Figure 14
The gist of this hierarchy suggests that Grace and Enemy are so similar you can reuse a number of features and behaviors by deriving them from a common super class, Agent which is necessarily abstract. Only some of the key members are given for Agent. The table below gives the semantics for Agent members.
Table 4. This table gives semantics for some Agent members.
|
Member |
Semantics |
|
m_iX, m_iY |
X, Y coordinates of agent in the game world |
|
m_iXSpeed, m_iYSpeed |
Speed in pixels per step |
|
m_iDir |
Direction, i.e., GO_UP, GO_DOWN, etc., |
|
m_bMovePending |
Sometimes true for Grace; always True for enemies |
|
m_bPC |
Always true for Grace, always false for enemies |
|
GetABO |
For Grace this returns a reference to the directional ABO; for enemies, it’s a reference to m_kABO. |
|
MoveOnCondition |
Invoked by Grace::Update and Enemy::Update. |
|
Move |
Invoked by MoveOnCondition. |
|
Collided |
Invoked by MoveOnCondition if a collision is detected. For Grace, Collided does basically nothing. For enemies, it causes them to reverse direction. |
|
SetPosition |
Transfers m_iX and m_iY into the ABO. |
Finally, you’ll need random numbers to implement random movements. Use gedi::Random.